WebFOCUS
Online Help > Managed Reporting End User > Using Java Applet Managed Reporting > Creating a Report or Graph
Creating a Report or Graph
A Reporting Object is the basis for every report or
graph you create. Reporting Objects contain the fields that you
select in a reporting tool to build your report or graph. After
you select fields for your report or graph, you can manipulate and
style the data to suit your needs. The fields you select determine
the data displayed in the output of your report or graph. A Reporting
Object may also contain a template, created by your Administrator,
that defines the formatting styles for your report or graph.
Note: Custom Reports are not created with Reporting Objects.
For more information, see How to Create a Custom Report.
When creating a report or graph:
- Choose the Reporting Object.
When you create a new report or graph,
you must choose a data source to build your report. Data in Managed
Reporting is stored in Reporting Objects and organized within group
folders or subgroup folders. The Reporting Object group folders
and the Reporting Objects they contain are designed by a developer
or your Administrator. Reporting Objects are the information sources
that you report from.
- Choose a reporting tool.
After you select the data source, you
must choose a reporting tool:
- Choose Report Assistant to create basic
reports quickly and easily. You must specify a minimum of one field
in order for Report Assistant to save the report.
- Choose Graph Assistant to create graphs
and charts in a wide range of colors and styles. You must choose
a field for both the X- and Y-axis in order for Graph Assistant
to save the report.
Procedure: How to Choose a Reporting Object
- From the Reporting Objects tab, select
a Reporting Object from the list window.
or
- From the My Reports tab, click New and
select a Reporting Object from the list window.
Procedure: How to Choose Your Reporting Tool
Example: Using a Reporting Object
The
following example assumes you create a report with Report Assistant.
You can also select Graph Assistant to create a graph. For more
information on using Graph Assistant, see Creating a Graph With Graph Assistant.
- Open the Regional
Sales Domain.
- Select the Reporting
Objects tab.
WebFOCUS displays a list of group folders.
- Expand the Product
Sales group folder.
- Select Regional
Product Sales.
- Click Report
Assistant to open the reporting tool.
- Select the
data and options you want to apply to your report.
- To save your
report, click Save in the Report Assistant window.
Your
report will be saved to the My Reports tab under the Product Sales
group folder.
- To return to
Managed Reporting, click Quit in the Report Assistant
window.
Procedure: How to Create a Custom Report
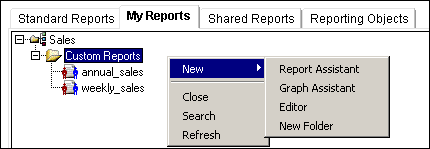
-
Right-click
the Custom Reports folder and select New.
The following image shows the My Reports window displaying
the pop-up menus that appear when you right-click the Custom
Reports folder and choose New.

-
Select
the tool for creating your report or graph.
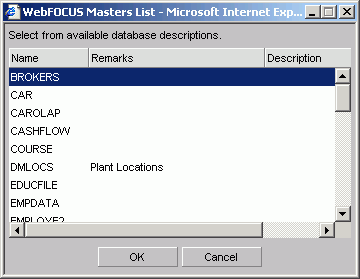
The Master File dialog box appears. If you choose New Folder,
you can specify a subfolder name and then create a Custom Report
using Report Assistant, Graph Assistant, or the Editor.
Note: Custom
Reports can only be created and edited with the HTML version of
Report or Graph Assistant, even if you have set the flag for the
Java Report or Graph Assistant.
The following image shows
the Masters List window containing a list of available database
descriptions.

Note: The list
of Master Files is determined by the Default Reporting Server's
profile settings, or the Server and Application Path settings on
the Domain if applicable. You do not have the ability to set the
Server and Application Path at the Custom Report level at this time.
-
Select
your Master File and click OK to open the
tool of your choice.
Note: You can scroll through the Master File list
quickly by typing the first letter of a data source. For example,
if you type 'T' the list will advance to the Training data source.
-
Design
your Custom Report.
-
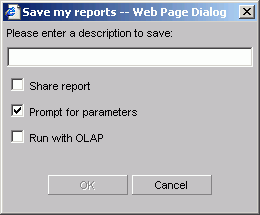
Click Save
As to open the Save My Reports window as shown in the
following image.

-
Enter
a name for your report and select the options of your choice. For example,
select the Share report check box to share
your report with other users.
-
Click OK to
save your report as a Custom Report.
-
You
can access your Custom Report under the Custom Report folder in the
My Reports tab as shown in the following image.

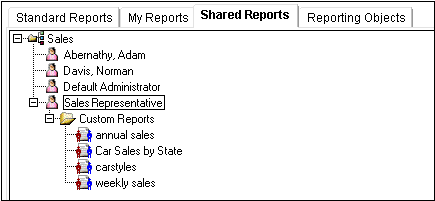
-
If you
share your Custom Reports, they will be available to other users in
the Shared Reports tab as shown in the following image.

Duration of Custom Reports and My Reports Folders
Users with the Advanced privilege can create Custom
Reports, and will always have a Custom Reports folder under the
My Reports tab, even if the Custom Reports folder is empty. When
a user with the Advanced privilege logs on to Managed Reporting
for the first time, a Custom Reports folder is created and remains
for the duration of all sessions. This user
The folders that appear under the My Reports tab are based on
existing Reporting Objects folders, and are only added you create
a My Report from a Reporting Object. When the last My Report for
a Reporting Object is deleted, the corresponding folder is automatically
removed. The Custom Reports folder cannot be removed because it
only exists under My Reports for that particular user.


