WebFOCUS Online Help > Managed Reporting Administrator > Creating Domains, Groups, Roles, and Users > Creating Domains
In this section: |
The Domains tab is used by Managed Reporting Administrators to create, edit, and delete domains. Developers who have the Data Server privilege can use the Domains tab to edit the Server and Application Path properties on domains to which they have development access. To learn how to control which domains developers have development access to, see Assigning Development Domains.
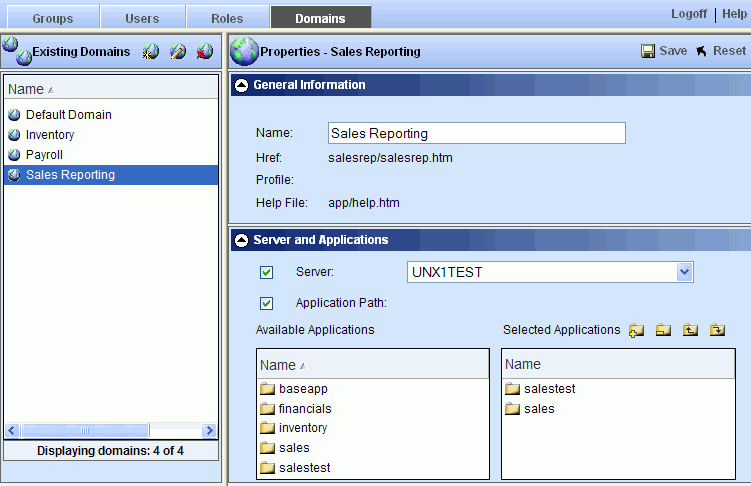
The following image shows four domains in the list pane on the left, and the properties for the selected domain, Sales Reporting, in the detail pane on the right.
You can change the alphabetical sort order of the domains in the list pane by clicking the Name column.
You can create a new domain by clicking the New
 icon
on the toolbar and entering the name of the domain in the Name field
of the detail pane. Optionally, you can define a specific Reporting
Server and/or server application path to be used for reports run
from this domain. For more information about these properties, see Working With the Server and Application Path Properties.
You can modify a domain's properties by selecting it in the list
and clicking the Edit
 icon
on the toolbar. You can also double-click a domain in the list to
display and/or edit the domains properties.
You can delete domains by selecting them in the list pane and
clicking the Delete
 icon
on the toolbar. You can also press the delete key to delete selected
domains. The list pane supports multi-select functionality by holding
down the Shift or Ctrl key while selecting.
Note: Administrators can create, edit, and delete domains from within Developer Studio (except for the MR Developer for Windows edition) and in the Managed Reporting Domain Builder applet. Developers with the Data Servers privilege can edit a domain's Server and Application Path properties from within these tools. Administrators can also create domains with the MR Change Management load utility. For details, see Change Management.
Managed Reporting administrators and developers (if the developer has the Data Server privilege) can edit a domain's Server and Application Path properties. By default, these properties are initially unselected and the default Reporting Server appears in the Server list as shown in the following image.
When the Server option is unchecked, WebFOCUS determines which server to use for report requests and displays it in the list. Typically, the server shown is the IBI_REPORT_SERVER value defined in the Configuration area of the WebFOCUS Administration Console in the Reporting Server selection under Client Settings. A different server may be shown in some customized configurations.
You can check the Server option to choose a server from the list when you have multiple servers and want to control which server is used to run reports from this domain.
When the Application Path option is unchecked, the WebFOCUS Reporting Server determines which application folders to search for metadata and included procedure files. The search path is determined by a number of factors including APP PATH commands found during server profile processing and in the report request itself. For more information about server profile processing, see the WebFOCUS Security and Administration manual.
You can check the Application Path option to override the server's search path for reports run from this domain. When you check this option, a request is sent to the server shown in the Server list to retrieve the set of available applications. Depending on your security configuration, you may be prompted for your server credentials.
Alternatively, you can double-click applications to move them to the Selected Applications list.
You can also remove applications from the Selected Applications list by selecting the application(s) and clicking the Remove icon.
Note: The server searches applications in top to bottom order.
| WebFOCUS |