WebFOCUS
Online Help > Managed Reporting End User > Creating a Graph With Graph Assistant >
Selecting Records for a Graph
Selecting Records for a Graph
When generating a report and specifying which fields to display,
you may not want to show every instance of a field. By including
selection criteria, you can display only those field values that
meet your needs. In effect, you can select a subset of the data,
which you can easily redefine each time you issue the report request.
When developing a report request, you
can define criteria to select records based on:
- The values
of an individual field (using a Where statement).
- The aggregate
value of a field, for example, the sum or average of a field's values (using
a WHERE TOTAL statement).
The Selection criteria tab enables you to create Where or Where
Total statements for record selection.
Creating a Where or Where Total Statement
Where and Where Total statements enable you to display
only those records that pass your selection criteria. These statements
select the data source records to be included in a report. The data
is evaluated according to the selection criteria before it is retrieved
from the data source. Use the Selection criteria tab to create a
new Where or Where Total statement.
Note: In the Graph Assistant, when you create a Where
statement in the Selection Criteria tab for a range of dates using
FROM - TO, you will not be alerted if the TO field is chronologically
before the FROM field. For example, if you enter something like
"from 12/31/05 to 1/1/05". There will be no records in the resulting
report.
Procedure: How to Select Records Based on Values, Parameters, Fields, or a Constant
-
In the
Graph Assistant, click the Selection criteria tab.
-
Select
a field from the Available Fields window and drag the field to the Screening
conditions pane.
or
Press Alt+M to
go to the Available Fields window, tab to the field and press Enter to
add the chosen field.
The field name and EQUAL to and Select
values appear in the Screening conditions pane.
-
Select WHERE or WHERE TOTAL.
-
Select
an operator from the drop-down list (for example, EQUAL
to) in the right pane.
-
Click Select
values to complete the expression.
-
Select
one of the following compare type option buttons:
-
Constant. Enter
a value that will serve as a constant (a value that will not change).
For example, enter vehicle.
After you click OK,
the constant, vehicle, appears in the WHERE statement which reads
BODYTYPE EQUAL to vehicle.

-
Parameter. Enter
the name of the variable. For example, moped as shown in the following
image with the Parameter option button selected and the variable
name entered as moped.
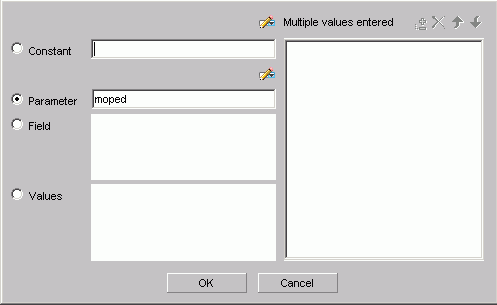
You can set parameter
properties, for details see Setting Parameter Properties.
After you click OK,
the parameter, &moped, appears in the WHERE statement which
reads BODYTYPE EQUAL to &moped.

Note: The ampersand
is automatically added by WebFOCUS.
-
Fields. Select a field from the
list.
After you click OK,
the field BHP appears in the Where statement which reads CAR.COMP.CAR
EQUAL to CAR.SPECS.BHP.

-
Values. Select
a value for the field you initially chose (in this case, car).
After
you click OK, the value, Audi, appears in
the Where statement which reads CAR.COMP.CAR EQUAL to AUDI.

Procedure: How to Create a Where Statement Using Date and Time Values
In the Graph
Assistant,
-
Click
the Selection criteria tab.
-
Select
a field from the Available Fields window and drag the field to the Screening
conditions pane.
or
Press Alt+M to
go to the Available Fields window, tab to the field and press Enter to
add the chosen field.
-
Click EQUAL
to in the right pane to display a list of operators.
Click the operator of your choice.
-
Click Select
values to complete the expression.
-
Click Field to
access date and time values for that field. For example, EYEAR.
-
Click Values and
click the value of your choice. For example, 1989/01/18.
After you click OK, the value, 1989/01/18, appears
in the WHERE statement which reads START_DATE EQUAL to 19890118.

Importing Values From External Files for WHERE Statements
When developing a query, you can use a locally saved,
external file as selection criteria to limit query results. This
enables you to quickly build a query containing a large number of
WHERE statement values without having to manually enter repetitive
or readily available data.
Procedure: How to Create a Value List From an External File
-
Navigate
to the Selection criteria area.
-
Begin creating a WHERE statement
by selecting a field from the list of available fields.
-
Select
a data comparison option that can accept multiple values.
Valid options include EQUAL to, NOT EQUAL to, IN literal
list, NOT IN literal list, EXCLUDES literal list, and INCLUDES literal
list.
-
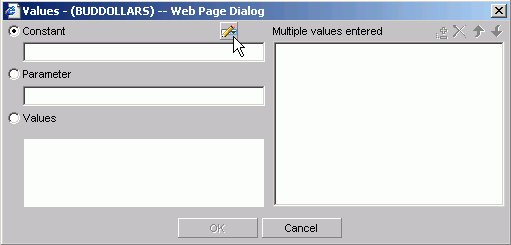
Click Select values.
The Values dialog opens.
-
Click the import button as shown
in the following image.
A dialog box opens
as shown in the following image.
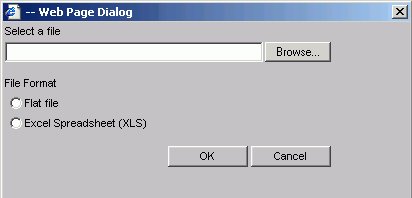
-
Select either the Flat file or Excel Spreadsheet (XLS)
File Format option.
-
Click the Browse button.
A standard file selection dialog opens.
-
Select an external file to import from your local machine
or network.
Note: The external file must only contain text with
new line delimiters.
-
Click OK.
The values contained in the file are displayed in the Multiple
values entered list in the right pane of the dialog.
-
Optionally, you can remove specific values from the Multiple
values entered list or move values up or down within the list.
-
Click OK.
You can save the query for future use and reopen the query
to append new or remove existing values.
Setting Parameter Properties
When you create parameters for Selection Criteria (WHERE
statements) you can set the properties for the parameter. For example,
you can create a dynamic or static list of values to choose from
at run time.
Procedure: How to Set Parameter Properties
-
In the
Graph Assistant, click the Selection criteria tab.
-
Create
a WHERE or WHERE TOTAL expression.
-
Select
an operator. Some operators are not supported with the Variable Editor,
see Supported Operators for the Variable Editor for details.
-
Click Select
values.
The Variable Editor dialog box opens.
-
Select
the Parameter option.
-
Click
the Auto Prompt button.
The Parameter Properties dialog box opens.
-
Verify
the Name and Description fields, which are automatically populated
based on the field you are screening on. You can edit the populated
values as needed.
Note:
- If the Description
is a single word and the parameter is for a numeric field, you must
add a space at the end of the description to avoid a parsing error.
- The Description
cannot contain a period (.) because a period is the delimiter to specify
the beginning and end of the description value.
-
Choose the Selection type, Dynamic or Static.
The Dynamic
option is selected by default.
Optionally,
choose the Select multiple values at runtime check
box to provide multiple values to the report from the auto prompt
page at run time.
-
Set the parameter values.
- For the Dynamic selection type, the
Data Source and Field values are selected by default based on the
field you are screening on and can be changed as needed.
If you
want to see the fully qualified Field name, select the Display
fully qualified field name check box. This setting is
for display purposes only and is not preserved.
Note: When working with a Reporting
Object, you can select only fields from data sources that the Reporting
Object is defined to access.
- For the Static selection type, select
the Constant or Show field values option.
For Constant, enter one or more values. For Show field values, all
of the values for the selected field appear in the list box. Move
the values you want from the selection list to the Prompt values
list.
-
Click OK to
exit the Parameter Properties dialog box.
Reference: Supported Operators for the Variable Editor
|
Operator
|
Enabled for the Variable editor?
|
|---|
|
Equal to
|
Yes
|
|
Not equal to
|
Yes
|
|
Greater than
|
Yes
|
|
Less than
|
Yes
|
|
Greater than or equal to
|
Yes
|
|
Less than or equal to
|
Yes
|
|
In literal list
|
No
|
|
Not in literal list
|
No
|
|
Missing
|
No
|
|
Not missing
|
No
|
|
From - to
|
No
|
|
Not-from - to
|
No
|
|
Includes literal list
|
Yes
|
|
Excludes literal list
|
Yes
|
|
Contains characters
|
Yes
|
|
Omits characters
|
Yes
|
|
Like character mask
|
Yes
|
|
Not like character mask
|
Yes
|
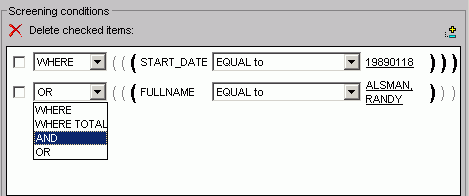
Use the right pane of the Selection Criteria tab to
use or delete existing Where statements and to combine expressions.
Procedure: How to Combine Expressions
-
Create
an expression.
-
When
you create additional expressions, they are combined with the default
operator AND as shown in the following image with two statements,
the first a WHERE and the second an AND statement.
-
Toggle
between AND, OR, WHERE, and WHERE TOTAL by clicking the AND to make
your choice.
Procedure: How to Delete an Active Expression
-
Select
the check box next to the expression you want to delete. Click the Delete icon
above the box.
-
You
are prompted to delete the expression. Click OK to delete.
Grouping Expressions Together With Parentheses
You can use parentheses to group expressions together
to optimize the Where statement.
Procedure: How to Group Where Statements Together Using Parentheses
Click
the grayed out parentheses to activate the parentheses and group
expressions together.
Limiting Data With Filters
Filters enable you to quickly select predefined criteria
that limit data included in a graph. Filters are selection criteria
(WHERE statements) that an Administrator creates for you to apply
as needed, without having to create your own selection criteria.
WebFOCUS displays filters in filter groups. Each filter group
can contain multiple filters. Selecting a single filter within one
group creates a report with simple filtering criteria. By selecting
multiple filters within a group or combining filters from different
groups, you can create complex filtering expressions.
Note: Filters are only available when you are creating
a graph using a Reporting Object as a template. If you do not see
filters, this means they have not been developed for this Reporting
Object. Filters are not available when building a Standard Report
or a Custom Report.
The following image shows a few sample filters as they appear
in the Selection Criteria tab of the HTML Graph Assistant. They
are listed by Group and Name.
