WebFOCUS
Online Help > Managed Reporting End User > Using Power Painter > Using Standard Reporting Functions
Using Standard Reporting Functions
The following standard reporting
functions are available within the Data Sources palette of the Power
Painter tool:
- Create a virtual
field (DEFINE) for your report.
- Create a report
level calculation (COMPUTE) for your report.
- Add a JOIN
relationship by using the Joins tab in the Data Sources palette.
- Create conditional
styling rules by using the Create Conditional Style Rule dialog box.
- Create filters
(WHERE/WHERE TOTAL statements) using the Selection Criteria palette.
- Use the Auto
Prompting Facility to select parameters for your report.
Procedure: How to Create a DEFINE Statement
-
Click the Define
 button
from the Data Sources palette.
button
from the Data Sources palette.
The Field
creator dialog box opens.
-
Type the name of the virtual field
in the Field input box.
-
Enter an expression in the expressions
box.
-
Click OK to
close the Define field creator dialog box.
The DEFINE field is added to the report field list.
-
Drag
and drop the DEFINE field into the report.
Procedure: How to Create a COMPUTE Statement
-
Click
the Compute
 button
from the Query palette.
button
from the Query palette.
The Field creator dialog box opens.
-
Type
the name of the computes field in the Field input box.
-
Enter
an expression in the expressions box.
-
Click OK to
close the Compute field creator dialog box and apply the COMPUTE
statement.
The COMPUTE field is added to the report.
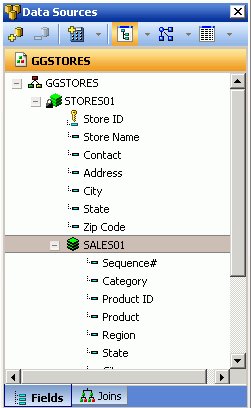
Procedure: How to Create a JOIN Between Data Sources
-
Click
the Joins tab in the Data Sources palette.
-
Click
the Add Join button from the Data Sources
palette toolbar.
-
Select
a target Master File and click OK.
The Create Join dialog box opens.
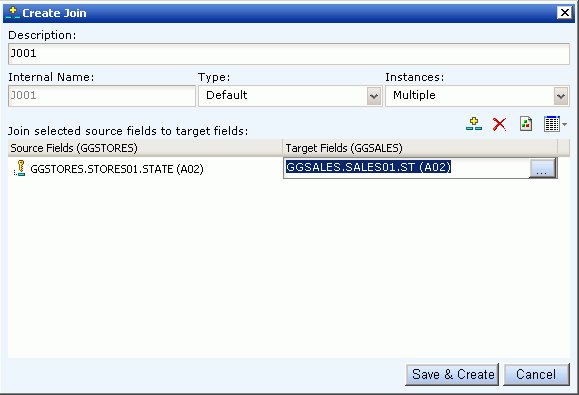
Note: Joins
can also be created on defined fields. For more information about
defined fields, see How to Create a DEFINE Statement.
-
Type
a name for the Join in the Description field.
-
Select
the Type and Instances for the Join or use the default selections.
-
Click
the Select a source field browse (...) button
to select the Join source field.
-
Click
the Select a target field browse (...) button
to select the target fields.
Note: If no target fields are available, you are
notified that there are no fields found.
-
Click Save
& Create to save the Join relationship.
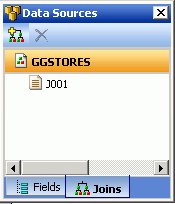
The joined field is added to the Joins tab.
-
Click
the Fields tab in the Data Source palette to
view the joined data.
-
Drag
and drop joined fields onto the canvas as you would any other field.
Note: To
edit a join, double-click the join.
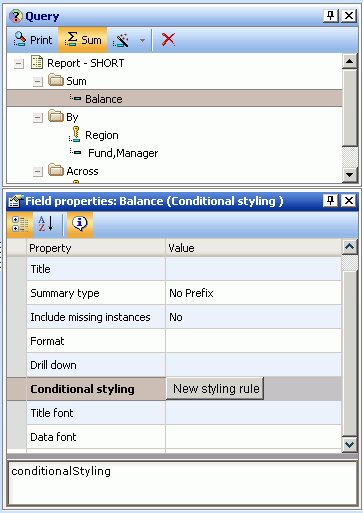
Procedure: How to Create Conditional Styling Rules
-
Open
the Query pop-up dialog box or Query palette in the canvas.
- To open the Query pop-up dialog box,
click the Query button above the selected
object (or right-click the object and select Query from
the context menu).
- To open the Query palette, from the
View menu, select Palettes, then select Query from the
Palettes submenu.
-
Select
the field name in the Query pop-up dialog box or Query palette.
When fields are selected, properties for each field are
available in the Field properties palette.
-
Click
the Field properties palette and scroll down until you see Conditional
styling.
-
Click
in the Conditional styling value field and select the New
styling rule button.
The
Create Conditional Style Rule dialog box opens, as shown in the
following image.
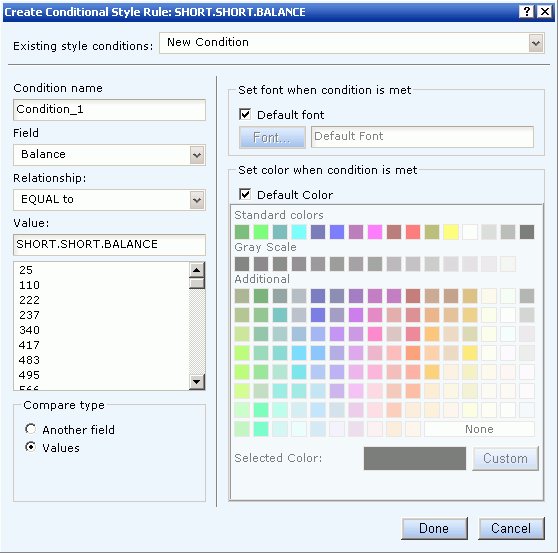
-
Create the style conditions for the
field.
-
Type a name for the condition or accept
the default.
-
Select a relationship for the condition
from the Relationship drop-down list.
-
Specify a value by doing one of the following:
- Type a literal
value in the Value input field.
or
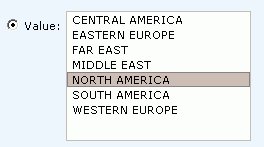
- Click Values from
the Compare type section to display existing data source values.
-
Click Done to save and apply the conditional
style rule.
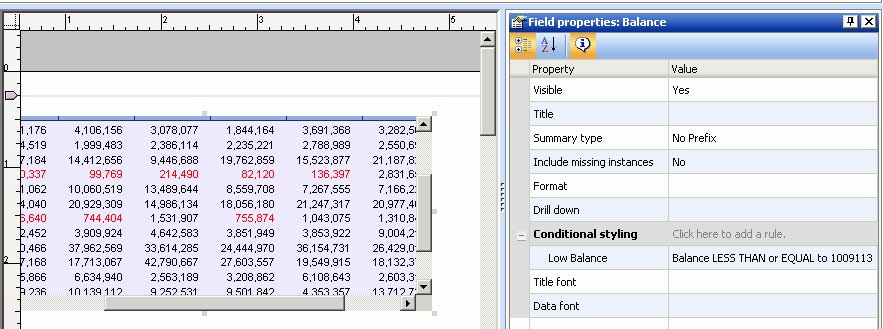
The condition is added to the Field properties palette
and the condition is applied to the data on the Power Painter canvas.
The
following image is an example of the Field properties palette with
a Low Balance condition rule. The report object shows red text where
the conditional styling rule was applied.
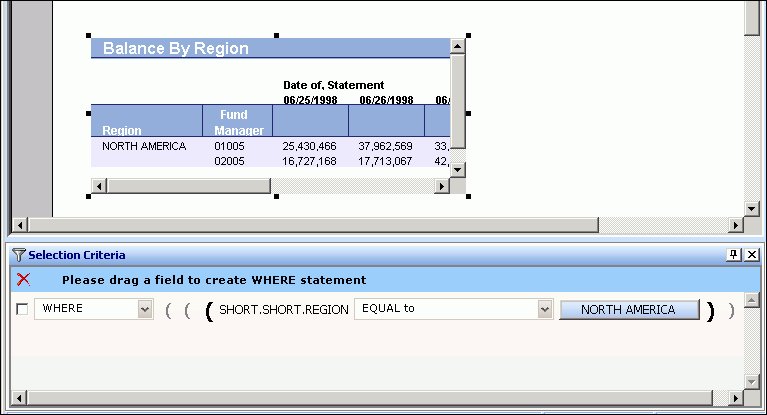
Procedure: How to Create a WHERE Statement
-
Select a report or graph object in
the Power Painter canvas.
-
From the View menu, select Selection
Criteria from the Palettes submenu.
The Selection Criteria palette
appears on the bottom of the canvas.
-
Drag a
field name from the Data Sources palette to the Selection Criteria
palette.
The WHERE statement is added to the Selection Criteria
palette.
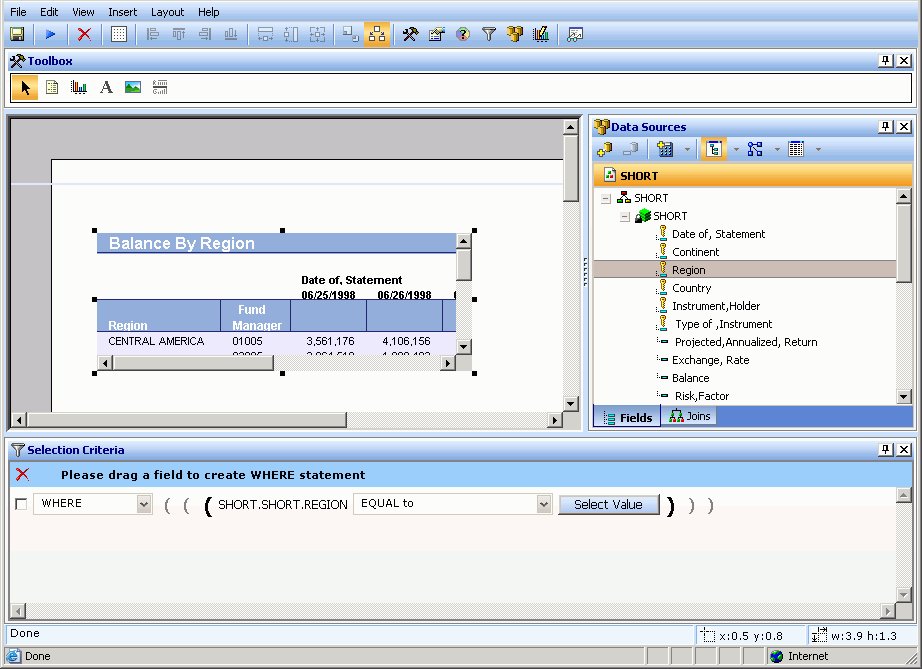
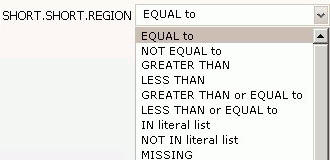
-
Specify the condition by using the
drop-down list.
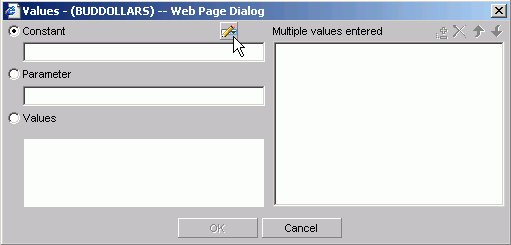
-
Click Select
Value to open the Select Value dialog box.
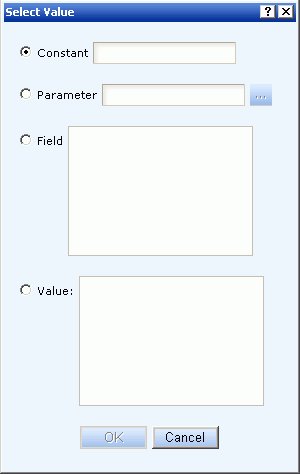
-
Select a Constant, Parameter, Field or Value selection
button.
-
Click OK to
close the Select Value dialog box.
The value is added to the Selection Criteria palette and
the report or graph reflects the WHERE statement as soon as the
value is selected.
Note: To
delete the WHERE statement, select the WHERE statement check box
and click the red X on the blue highlighted line in the Selection
Criteria palette.
Importing Values From External Files for WHERE Statements
When developing a query, you can use a locally saved,
external file as selection criteria to limit query results. This
enables you to quickly build a query containing a large number of
WHERE statement values without having to manually enter repetitive
or readily available data.
Procedure: How to Create a Value List From an External File
-
Navigate
to the Selection criteria area.
-
Begin creating a WHERE statement
by selecting a field from the list of available fields.
-
Select
a data comparison option that can accept multiple values.
Valid options include EQUAL to, NOT EQUAL to, IN literal
list, NOT IN literal list, EXCLUDES literal list, and INCLUDES literal
list.
-
Click Select values.
The Values dialog opens.
-
Click the import button as shown
in the following image.
A dialog box opens
as shown in the following image.
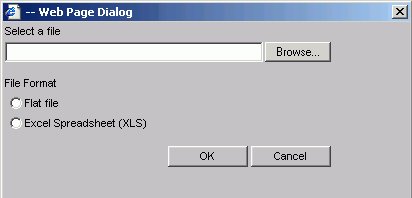
-
Select either the Flat file or Excel Spreadsheet (XLS)
File Format option.
-
Click the Browse button.
A standard file selection dialog opens.
-
Select an external file to import from your local machine
or network.
Note: The external file must only contain text with
new line delimiters.
-
Click OK.
The values contained in the file are displayed in the Multiple
values entered list in the right pane of the dialog.
-
Optionally, you can remove specific values from the Multiple
values entered list or move values up or down within the list.
-
Click OK.
You can save the query for future use and reopen the query
to append new or remove existing values.
Creating Parameters for Use in the Auto Prompting Facility
When a parameter selection criteria is added in Power
Painter, the auto prompting facility appears at run time.
For more information about creating and
applying auto prompting templates, see the Changing WebFOCUS
Client Settings in the WebFOCUS Administration Console section
of the WebFOCUS Security and Administration manual.
Procedure: How to Create Parameters and Run in the Auto Prompting Facility
-
From
the Selection Criteria palette, create a WHERE statement.
-
Click the Select
Value button.
The Select Value dialog box opens.
-
From
the Select Value dialog box, select Parameters and
click the Edit Parameter Properties button.
The Variable Editor dialog box opens.
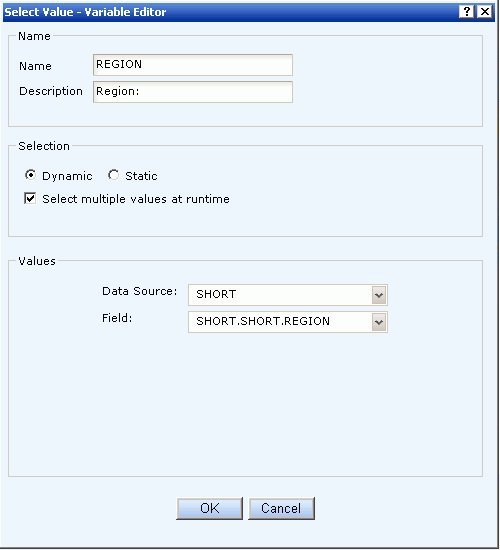
-
In the
Variable Editor dialog box, verify the Name and Description fields, which
are automatically populated based on the field you selected to create
the WHERE statement.
You can edit the populated values as needed.
-
Choose from the following Selection
options:
For either the
Dynamic or Static option, you can select the Select multiple
values at runtime check box to provide more than one
value to the report from the auto prompt page. In addition, the
user will be able to select all values from the values list.
-
Click OK to
exit the Variable Editor.
The parameter is added to the Select Value dialog box.
-
Click OK to
close the Select Value dialog box.
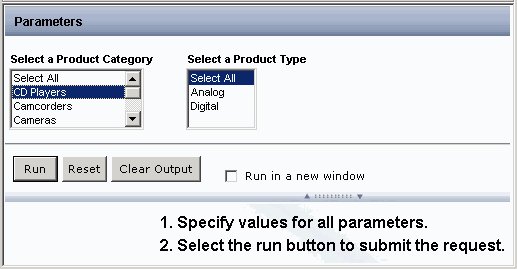
-
Click Run from
the File menu in Power Painter.
The Auto Prompting facility appears.