WebFOCUS Online Help > ReportCaster Development and Administration > Creating and Maintaining a Schedule > Schedule Tab
In this section: |
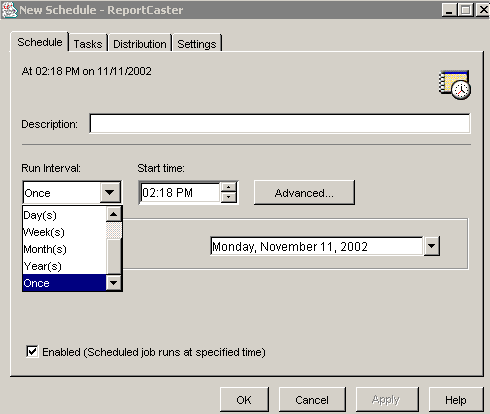
When you access the ReportCaster Development and Administration Interface, click the Create a New Schedule link to access the New Schedule - ReportCaster window. The Schedule tab is the first to display:
In the Schedule tab, specify the job description, the run interval, and the date and time you want the schedule to run. You can select to have the schedule run once or repeatedly on any day at any time. Uncheck the Enabled check box if you want the schedule to be inactive.
Tip: ReportCaster Administrators have the ability to define dates on which schedules cannot run or be set to run. For more information about defining blackout dates for your ReportCaster site, see Schedule Blackout Dates.
Enter the following information to create a new schedule or modify an existing schedule.
Note: Selecting this option may affect system performance if you choose to run the schedule every 5 minutes or less. Information Builders recommends specifying a minimum of 30 minutes. The minute interval option is primarily useful for alert schedules.
Note: When selecting the Week(s) interval, set the Start Date (located in the Advanced tab) to the date of the first day (current or future) of the week you want the schedule to run. If you select the current date, then you must make sure that the schedule Start time is later than the current time when you save the schedule. If the schedule Start time is less than or equal to the current time, the calculation for the next run time results in the schedule not running on the current date.
The following image shows a schedule that will run on the first Monday of every month. Although other Mondays are selected on the calendar, these dates are inactive since the 'Every n Day(s)' and 'The nth day of the month(s)' options are mutually exclusive.
The following image shows a schedule that will run on the 2nd, 9th, 16th, 23rd, and 30th every month. The schedule will not run on the first Monday of every month.
You can also click the Last Day of the Month option at the end of the calendar to run the schedule on the last day of the month.
Note: When selecting the Month(s) interval, set the Start Date (located in the Advanced tab) to the date of the first day (current or future) of the month you want the schedule to run. If you select the current date, then you must make sure that the schedule Start time is later than the current time when you save the schedule. If the schedule Start time is less than or equal to the current time, the calculation for the next run time results in the schedule not running on the current date.
Click Advanced if you want to specify a start date other than the current date.
The Advanced window within the Schedule tab is where you can change all default values for a schedule, and create a secondary run interval within the day the schedule runs.
Click Advanced within the Schedule tab to change the default values for the following options:
In the Advanced window within the Schedule tab, you can optionally create a secondary run interval within the day the schedule runs. You can apply the secondary run interval every n minutes or hours for a specified number of hours/minutes or until a specified time. This option is available for schedules that run every day(s), week(s), month(s), or year(s). The following image shows the Secondary run interval options:
Clicking the Apply secondary run interval check box activates the following options:
Note: The secondary run interval will not be validated when the schedule is created. Instead, validation is performed every time the schedule's NEXTRUNTIME is calculated when running within the secondary run interval. The secondary run interval cannot exceed the NEXTRUNTIME for the primary run interval. For example, a daily schedule cannot have a secondary run interval greater than Every 1 day(s). If a secondary run interval is scheduled to run after the schedule's next primary run interval, the secondary run interval is stopped and an error message is displayed to the user and written to the log file.
Click the Tasks tab to continue creating the schedule. For more information, see Creating a Task.
| WebFOCUS |