WebFOCUS
Online Help > ReportCaster End User > Introducing ReportCaster > Accessing and Using the Scheduling Wizard
Accessing and Using the Scheduling Wizard
As a Managed Reporting Analytical
User with schedule capability, you can schedule Standard Reports
or your own My Reports using the ReportCaster Scheduling Wizard.
The ReportCaster Scheduling Wizard can be accessed:
Note: If you do not have the schedule capability, contact
your Managed Reporting Administrator to request this capability.
Accessing the Scheduling Wizard From Managed Reporting or Dashboard
To create a new schedule from
Managed Reporting, right-click a Standard Report or My Report and
select Schedule from the drop-down menu.
To create a new schedule from the Dashboard, click a Standard
Report or My Report and select Schedule from the drop-down menu.
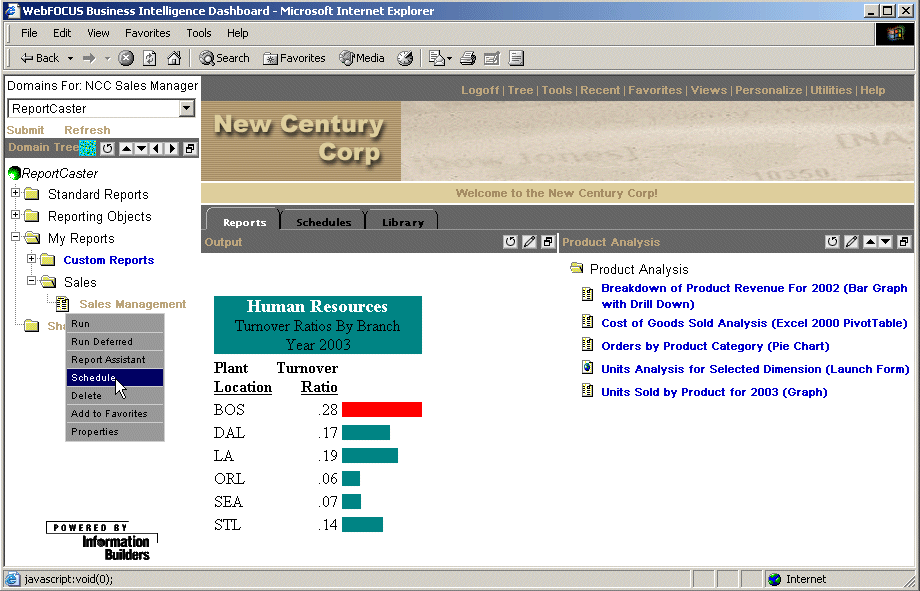
The following image shows the drop-down list used to select Schedule
in the Dashboard window.

This opens the Scheduling Wizard, which guides you through the
necessary steps for creating a schedule. For more information about
the Scheduling Wizard, see Creating a Schedule.
Note: Reporting Objects that have the "Show as Standard
Report" or "Show Only as Standard Report" property selected appear
as Standard Reports. However, these Reporting Objects cannot be
scheduled by ReportCaster.
Accessing the Scheduling Wizard From a Web Application
You can access the ReportCaster Scheduling Wizard from
a Web application independent of Managed Reporting or Dashboard
using the following URL
http://hostname[:port]/rcaster/enduser/rcScheduleForm.jsp?jspAction=
CREATE_SCHEDULE&IBIB_taskobj=filename&IBIB_folderhref=
folder_href&IBIB_domainhref=domain_href
where:
- hostname[:port]
Is the host name and optional port number (specified only
if you are not using the default port number) of the Application
Server where the ReportCaster Web application is deployed.
- rcaster
Is the site-customized context root for the ReportCaster
Web application deployed on your Application Server. rcaster is
the default value.
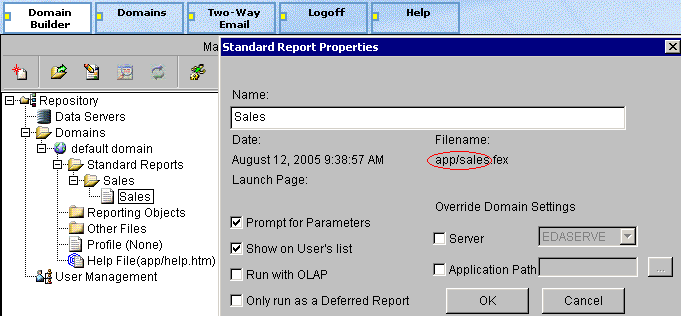
- filename
Is the file name of the Standard Report or My Report you
are scheduling, for example, app/salesrep (see Sample Filename).
Within the URL, replace app/ with app%2f. Do not include the .fex
extension. For example, specify this value as app%2fsalesrep.
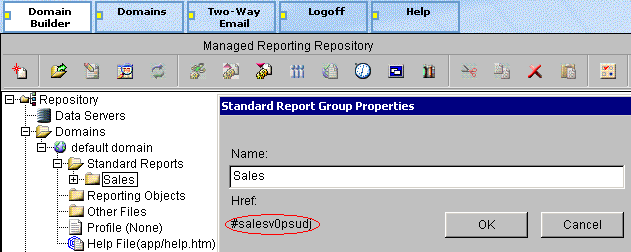
- folder_href
Is the HREF of the folder under which the procedure is stored,
for example, #salesv0psudj (see Sample Folder HREF).
Within the URL, replace # with %23 so that it appears as %23salesv0psudj.
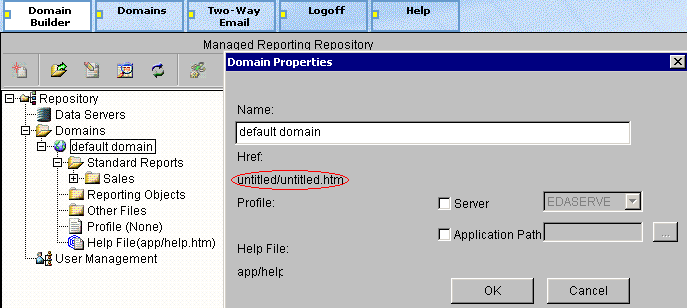
- domain_href
Is the HREF of the domain under which the procedure is stored,
for example, untitled/untitled.htm (see Sample Domain HREF).
Within the URL, replace the / separator with %2f, and the .htm extension
with %2ehtm. For example, specify this value as untitled%2funtitled%2ehtm.
Note: When you access the ReportCaster Scheduling Wizard
in this manner, a valid MR_COOKIE value must be passed to ReportCaster
for authentication purposes. Within the URL, special characters
have been URL encoded (for example, / is represented by %2f).
Reference: Sample Filename

Reference: Sample Folder HREF

Reference: Sample Domain HREF

Example: Accessing the ReportCaster Scheduling Wizard
Using
the sample values specified previously, you would type the following
URL to access the ReportCaster Scheduling Wizard independent of
Managed Reporting or Dashboard:
http://hostname[:port]/rcaster/enduser/rcScheduleForm.jsp?jspAction=
CREATE_SCHEDULE&IBIB_taskobj=app%2fsalesrep&IBIB_folderhref=
%23salesv0psudj&IBIB_domainhref=untitled%2funtitled%2ehtm
This
URL opens the Scheduling Wizard, which guides you through the necessary
steps for creating a schedule. For more information about the Scheduling
Wizard, see Creating a Schedule.


